Prolapse refers to a collapse, descent, or other change in the position of the uterus in relation to surrounding structures in the pelvis.
The following conditions can cause a prolapsed uterus:
Other risk factors
|
![]() Salamba Sirsasana (Headstand)
Salamba Sirsasana (Headstand)
- Kneel on the floor in Virasana. Clasp the inside of your left elbow with your right elbow with your right hand and the inside of your right elbow with tour left hand Now lean forward and place your elbows on the floor. Ensure that the distance between your elbows is not wider than the breadth of the shoulders. Release your hands and interlock your fingers to form a cup with your hands . Keep your fingers firmly locked, But not rigid. Place your joined hands on the floor.
- Place the crown of your head on the floor. So that the back of the head touches your cupped palms. Check that only the crown is resting on the floor, not the forehead, or the back of the head. In the final pose. Your weight must rest exactly on the centre. Not the back or front, otherwise, the pressure will fall on your neck or eyes, causing your spine to bend. Make sure that your little fingers touch the back of the head, but are not underneath it. Hold this position for a few seconds, breathing evenly.
- Push up on the balls of your feet and straighten your knees. Keep your heels raised off the floor. To ensure that your torso is perpendicular to the floor, walk your feet toward your head, until the back of your body forms a vertical line from your head to the back of the waist.
- Exhale, and bring your knees toward the chest. Then, press your toes down on the floor, and push your legs upward, off the floor. This action resembles a hop and gives you the thrust to raise your legs. Bring your heels close to your buttocks.
- Press your elbows to the floor and lift your shoulders up, away from the floor (see inset). Exhale, and gently swing your knees upward in a smooth arc, until both your thighs are parallel to the floor. In this position, the entire upper body, from the head to the waist and hips, should be perpendicular to the floor. Do not move your elbows until you come out of the final pose.
- Continue to move the knees upward, slowly bringing them to point to the ceiling. Keep the heels close to the buttocks. Focus on your balance and do not allow your torso to move during this action. Steps 5, 6, and 7 constitute a gentle. Continuous movement, as you raise your legs toward the ceiling.
- Once your knees are pointing to the ceiling, hold the pose for a few breaths. Make sure that the spine is straight. Tighten the buttocks. Ensure that your thighs are positioned perpendicular to the floor, your lower legs bent toward tour back. Check that your shoulders do not tilt. Pause and get used to the feel of the position.
- Straighten your knees to bring the lower legs in line with the thighs, so that your body forms a vertical line, point your toes toward the ceiling. Tighten both knees, as in Tadasana, and keep your thighs, knees, and toes together. The entire body should be balanced on the crown, not on the forearms and hands, which should simply support the balance in the pose. Stretch your upper arms, torso, and waist upward, along the legs to the toes, ensuring that your torso does not tilt. Steadiness and a constant lift of the shoulders ensure stability in the posture. Hold the pose for 5 minutes, breathing evenly.
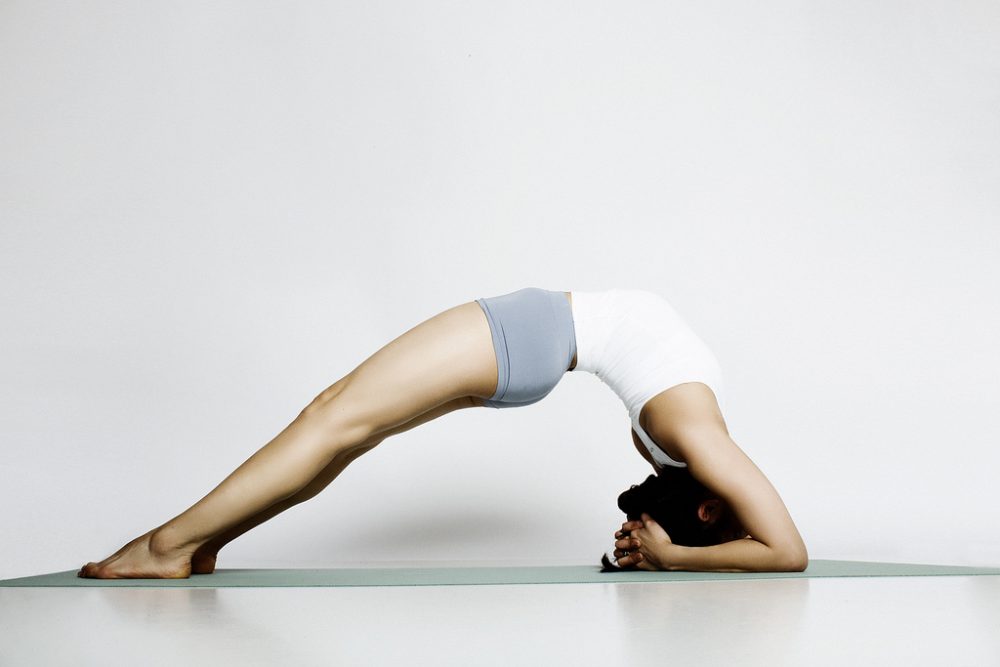
![]() Viparita Dandasana (Inverted staff pose)
Viparita Dandasana (Inverted staff pose)
- Place the bolster in front of the chair, with one end between the chair’s front legs. Place a blanket on the bolster. Drape the mat over the chair’s front edge and place the folded towel on the mat. Step your feet through the back of the chair, and sit down. If needed, tie a yoga belt round your legs to keep them together.
- Hold the sides of the chair back and slide your hips toward the back of the chair until your buttocks rest on the back edge of the chair. Exhale, and lift your chest, arching your entire back. Lower your torso, ensuring that the folded towel supports your lumbar spine.
- Place your crown on the bolster. Ensure that your lower back rests on the front edge of the seat. Insert your hands, one at a time, through the chair to hold its back legs. Do not press your head down on the bolster. Keep it perpendicular to the floor, as tilting the head too far back strains the neck and throat. Close your eyes. (Beginners must keep their eyes open to avoid disorientation) Straighten your legs to increase the stretch of your back. Hold the pose for 30-60 seconds and with practice, for 5 minutes.
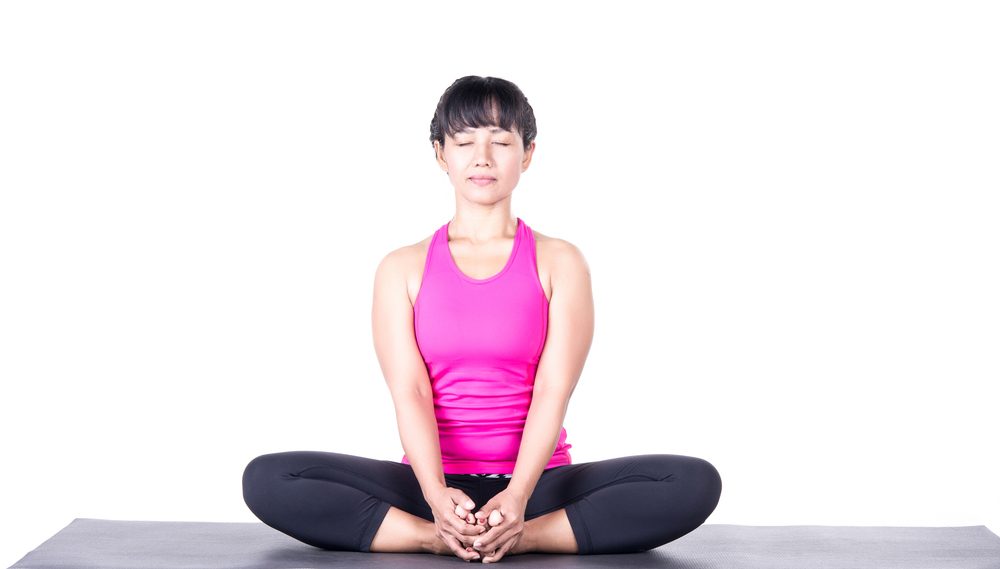
![]() Supta Baddhakonasana (Reclining fixed angle pose)
Supta Baddhakonasana (Reclining fixed angle pose)
- Sit in Dandasana . Place a bolster behind you, its short end against your buttocks, and place a folded blanket on its far end. Place 2 wooden blocks on their broad sides on either side of your hips. Bend your knees, and join the soles of tour feet together. Draw your heels toward your groin. Buckle the belt and loop it over your shoulders.Bring the belt down to below your waist. Pass it under both feet to stretch it over your ankles and the insides of the thighs. Move your feet closer to your groin. The belt should feel neither too tight nor too slack, so adjust the buckle accordingly. Make sure that the end of the bolster touches your buttocks. Position a block under each thigh.
- Place your elbows on the floor, and lower your head and back onto the bolster. Make sure that the bolster comfortably supports the length of your back and your head. Your spine should be on the center of the bolster. Stretch your arms out to the sides, with the palms facing the ceiling. Relax, and extend your groin out to the sides. Feel the expansion of the pelvis, and the release of tension in your ankles and knees. Initially, stay in the pose for 1 minute. With practice, increase the duration to 5-10 minutes.
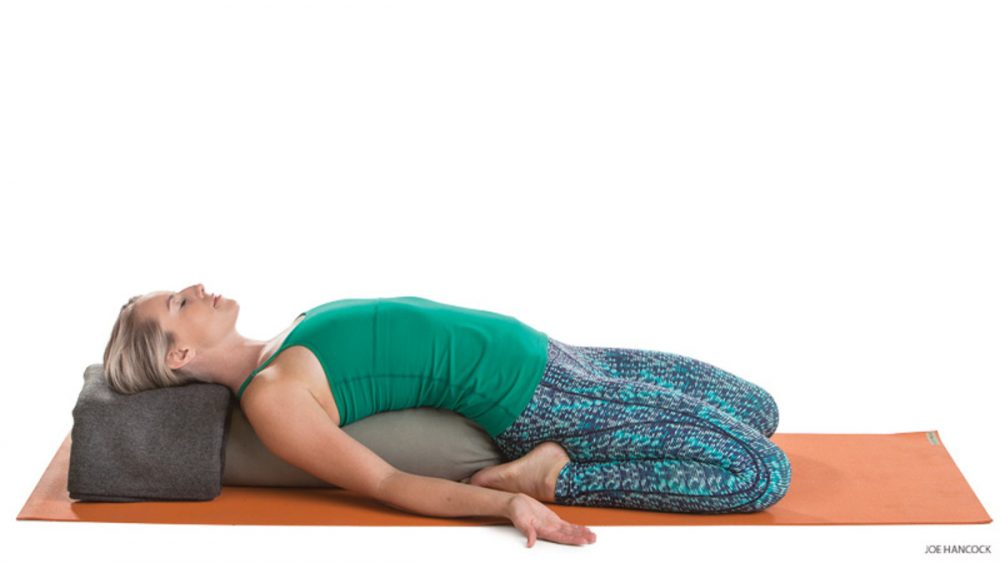
![]() Supta Virasana (Reclining hero pose)
Supta Virasana (Reclining hero pose)
- Kneel in Virasana and place a bolster behind you, the short end touching your buttocks. Place a rolled blanket on the far end. Make sure that the inner sides of your feet touch your hips. Keep your back straight. Place your fingers on the floor beside your toes.
- Press your palms on the floor, bend both elbows, and lean back toward the bolster. Place your elbows and forearms, one at a time, on the floor. Gradually lower your back onto the bolster. To avoid strain in the pelvic area or the thighs, ensure that your knees remain firmly on the floor.
- Once you lower your back onto the bolster, rest the pack of your head on the rolled blanket. Keep your chest fully expanded. Press your shoulder blades down on the bolster to lift your chest. Extend your toes and ankles toward the bolster. Push your feet closer to your hips with your hands. Extend the pelvis, and press your thighs close together.
- Move your arms out the sides, with the palms facing upward. Extend your neck, but keep your throat relaxed. Drop your eyelids down gently. Experience the relaxation of the thighs and the abdomen, and the lift of the chest. Feel the continuous stretch from the cervical spine to the tailbone. Initially, stay in the pose for 1 minute. With practice, increase the duration to 5-10 minutes.
![]() Supta Padangusthasana (Reclining leg, foot, and toe stretch)
Supta Padangusthasana (Reclining leg, foot, and toe stretch)
- Place a mat against a wall. Sit in Dandasana facing the wall. Keep a yoga belt beside you. The soles of your feet should touch the wall comfortably, with your toes pointing upward. Press both your palms down on the mat.
- Lower your back onto the mat, supporting your torso on your palms until your head rests on the mat. Bend your right knee, and bring it to your chest. Keep your left sole pressed against the wall. Loop the belt around the sole of your right foot. Hold one end of the belt in each hand. Make sure that your hold the yoga belt as close to your foot as possible. This opens your chest, and keeps your breathing regular and even. Keep your extended leg pressed down on the mat.
- Inhale and raise your right leg until it is perpendicular to the floor. Hold both ends of the belt with the right hand. Place your left arm beside your left hip, Press the left foot against the wall, and the left thigh on the mat. Stretch your right leg up further, simultaneously pulling your toes toward you with the belt. Feel the stretch in your right call. Keep your left leg firmly pressed to the floor. Do not bend either knee or allow the left leg to tilt out. Initially, stay in this position for 20-30 seconds. With practice, increase the time to 1 minute. Repeat the pose on the other side.
![]() Dandasana (Staff pose)
Dandasana (Staff pose)
- Sit on a folded blanket, with your spine erect and your knees bent, Position the blocks on their broad sides on either side of your hips. Then place your palms on the blocks. Sit on your buttock bones.
- Straighten each leg, one at a time, and join the inner sides of your legs and feet. Lengthen the calf muscles, and stretch your knees and toes. Keep your knees straight. Press your palms down on the blocks and stretch your elbows and arms.
- Lift your abdomen, freeing the diaphragm of tension. Hold the pose for 1 minute. Beginners may find it easier to separate their feet slightly, and should hold the pose for just 30 seconds.
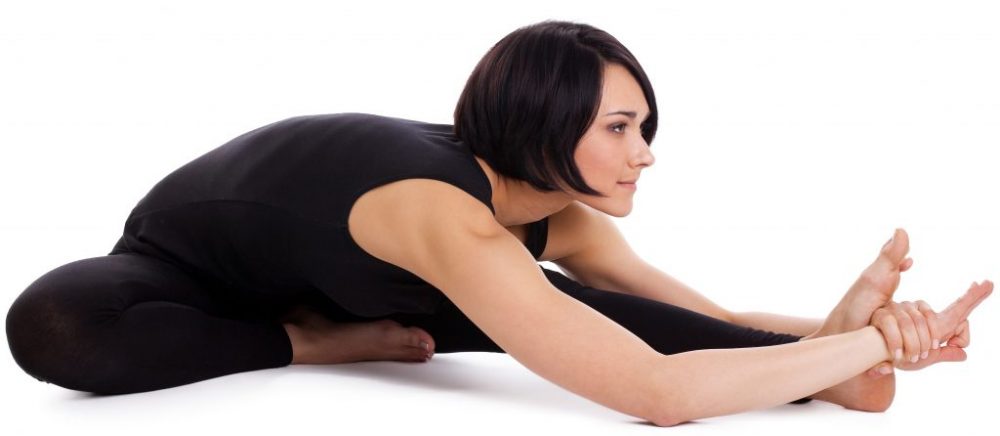
![]() Urdhavamukha Janu Sirsasana (Upward-facing bent knee pose)
Urdhavamukha Janu Sirsasana (Upward-facing bent knee pose)
- Spread a mat on the floor and place a folded blanket on it. Then sit in Dandasana on the blanket. Bend your right knee, so that the sole of your right foot touches your left thigh. The right heel should rest against the groin. Loop the belt around your left upper heel. Pull strongly on the belt and lift the torso.
- Straighten and stretch both arms. Press both thighs and the bent knee down on the floor. Tighten your grip on the belt, and stretch your spine up. Tilt your head back, breathing evenly. Hold the pose for 20-30 seconds. Repeat the pose on the other side.
![]() Prasarita Padottanasana (Intense leg stretch)
Prasarita Padottanasana (Intense leg stretch)
- Stand in Tadasana. Place your hands on your hips, with your thumbs on your back and your fingers on the front of the hips. Inhale, and spread your feet 1.2m (4ft) apart. Your feet should be parallel to each other, the toes pointing forward. Press the outer edges of your feet to the floor. Keep your back erect.
- Exhale, and lift kneecaps. Bend forward, extending your spine, and bring your torso down toward the floor. Look up as you bend to ensure that your back is concave. Take both hands off your hips, and lower them to the floor. Place your palms flat on the floor with your fingers spread out.
- Widen your elbows, keeping your palms flat on the floor. Place the crown of your head on the floor, between your palms. Push your stemum forward and draw the abdomen in. Move the thighbones and groin back to reduce the pressure on your head. Stay in the pose for 1 minute.
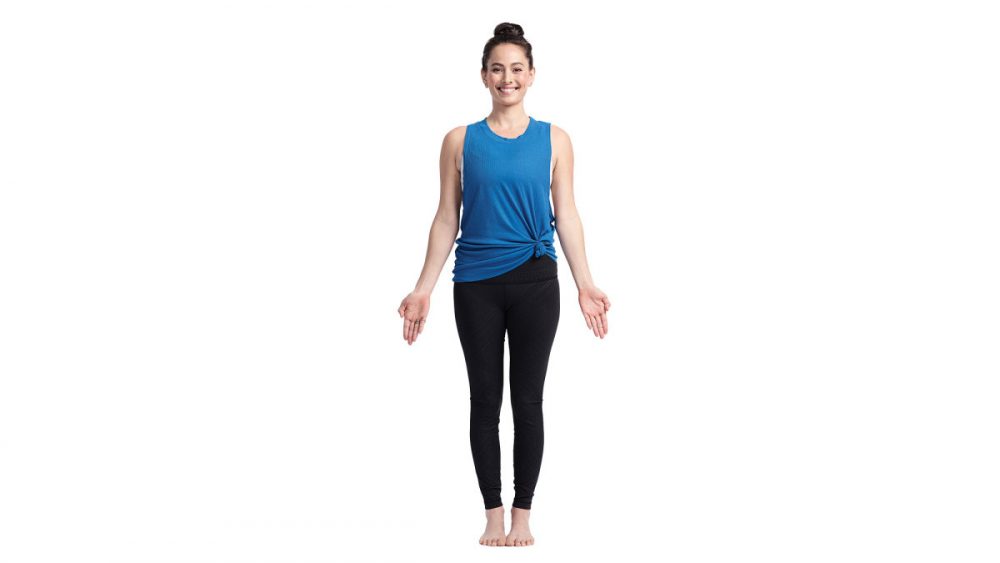
![]() Tadasana Samasthithi (Steady and firm mountain pose)
Tadasana Samasthithi (Steady and firm mountain pose)
- Stand in your bare feet on a smooth and even surface. Keep your feet together, with your heels touching the wall. Beginners may find it easier to keep their feet 5 cm (2 in) apart.
- Stretch your arms along your sides, with the palm facing your thighs, and your fingers pointing to the floor. Stretch your neck upward, keeping the muscles soft and passive.
- Distribute your weight evenly on the inner and outer edges of your feet and on your toes and heels. Tighten your kneecaps and open the back of each knee. Turn in the front of your thighs. Tighten your buttocks. Pull in your lower abdomen, and lift your chest.
- Keep your head erect and look straight ahead. Breathe evenly and with awareness. Experience your body and mind as an integrated whole and feel the surge of energy. Stay in the pose for 30-60 seconds.
![]() Tadasana Urdhava Hastasana (Mountain pose with arms stretched up)
Tadasana Urdhava Hastasana (Mountain pose with arms stretched up)
- Stand in your bare feet in Tadasana on an even, uncovered surface. Exhales, and stretching from your waist, lift your arms in front of you, to shoulder-level. Keep your palms open and facing each other.
- Raise your arms above your head, perpendicular to the floor. Stretch your arms and fingers. Push your shoulder blades into your body.
- Stretch your arms further up from your shoulder, keeping them parallel to each other. Extend your wrists, palms, and fingers toward the ceiling. Feel the stretch along both sides of your body.
- Pull in your lower abdomen. Turn your wrists so that the palms face front. Hold the pose for 20-30 seconds. Breathe evenly.
The prolapse of any organ is a very difficult problem to treat without surgery. Once the muscles and tissues that normally hold an organ in place have weakened and lost their structural integrity, it is very difficult to get them to return to their normal state. If the prolapse is very mild or minimal, there is a much better chance of reversing the condition.
Disclaimer
The Content is not intended to be a substitute for professional medical advice, diagnosis, or treatment. Always seek the advice of your physician or other qualified health provider with any questions you may have regarding a medical condition.