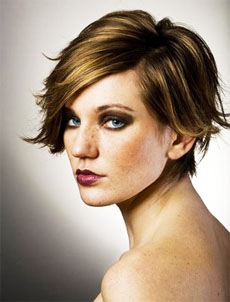
2012: the Year for Radical Hairstyles!
 In
the upcoming year look forward to layers, razor cut bobs, and
blunt bangs to freshen up for the season. This year will
probably see the women adding a lot more layers and volume to
the roots in their
hair, letting bangs fall over foreheads in a wispy- and
somewhat also long look that translates into a sexy framing of
the face. If you just can not part with your long hair, remember
that to get rid of the super-straight locks that were popular
last year. In
the upcoming year look forward to layers, razor cut bobs, and
blunt bangs to freshen up for the season. This year will
probably see the women adding a lot more layers and volume to
the roots in their
hair, letting bangs fall over foreheads in a wispy- and
somewhat also long look that translates into a sexy framing of
the face. If you just can not part with your long hair, remember
that to get rid of the super-straight locks that were popular
last year.
Looking incredible and appropriate for any occasion is
essential, and hair speaks volumes about how one can carry
oneself. There are a large number of
salons and hair stylists bringing in new styles, and those
who want to take a look at new styles by themselves will have to
try to find easy to follow, step by step
hairstyles and take a look at them out.
Center part is back
As the default hair parting for most women it seems somewhat silly
to cite a centre hair part amongst 2012�s
hairstyles. But bear with us. Hairstyle trends often have more than
one element about them, and that�s the case with the centre part in
2012. Suited to all hair colors, the centre part aligns itself with two
or 2012�s revival trends: �60s fashion and �70s fashion for spring /
summer 2012.
|
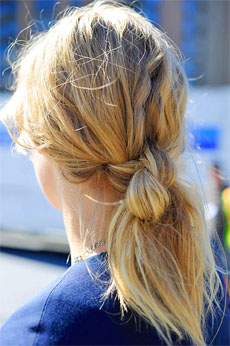 Double Hair Knot Double Hair Knot
Styled by Orlando Pita for the Michael Kors catwalk. To capture the
interpretation of the double hair knot, the simplest of instructions are as
follows:
-
First, spritz the hair all over with a sea-salt spray (Orlando Pita used
Bumble and Bumble Surf Spray)
-
Next, scrunch the hair into bunches while drying to add waves and
texture
-
Pull a thick section of hair out at the front, sweeping it into a deep
side part
-
Finally, take back two sections of hair and tie into a knot � then again
into a double knot
Braided topknot
-
Tilt your head forwards.
-
As of step three you�re going to begin braiding, and you�re going to
find it easier to achieve if your head is upside down � your arms won�t get
as tired from the process, and you�ll find it easier to hold your hair.
-
Starting at the nape of your neck start braiding, with the braid
traveling in the direction of the top of your head.
-
Notice that the braid here is raised. A regular (or �French�) braid sits
flat to the head, but the raised (called an �inverted French braid� or a
�Dutch
braid�) is much more effective for the braided topknot style. To create
a Dutch braid each added strand of hair needs to be woven under instead of
over the other strands.
-
Continue braiding until you get to your forehead�s hair line.
-
You should now have a braid that runs up the back of your head with an
end that sits atop your head. If you need to you can tie the end with a hair
elastic. Once you�re more experienced you�ll be able to hold it with your
hands.
-
Add in extra texture and more of a casual feeling, as desired, by gently
pulling at the plait section of the braids.
-
Grab the end of the braid that sits atop your head and twist it into a
small bun / knot. Mould it into a shape as neat or messy as you like,
remembering that this style works well with plenty of texture and doesn�t
need to be too polished.
-
Secure the bun / top knot in place with bobby pins selectively placed at
its base..
-
Finally, finish with some hairspray to hold the style in place.
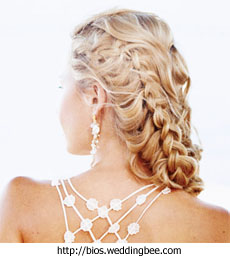 Half up braided hair Half up braided hair
-
Bottom half of your hair flowing free and the top half parted
into two sections.
-
Begin by separating the top two sections with a deep side part �
the side of your hair that you choose to part is up to you and will
most likely work best if you select to part your hair as it
naturally falls.
-
Next, take the larger of the two top sections and create a
French braid along the head at a diagonal angle (e.g. from the
part-line on the right side of the head back towards the left ear).
Don�t keep the braid too close to the head � remember it�s meant to
be a little textured and messy.
-
The braid should only reach about half way down the head, with
the rest of the hair hanging loose. After you�ve braided your hair
half way down, secure the end of the braid with several bobby pins,
crossing them over to ensure they stay in place. Repeat with another
French braid on the other side of the head, using up the smaller top
section of hair.
-
You should now have a half up hairstyle with two braids along
the top section. If it�s looking too neat, tousle up the braids with
the fingers to loosen the whole look up and give it that
effortlessly free-spirited feel. When you�re happy with the style
give the whole head a light spray with some hairspray to keep it in
place.
Bird�s nest bun
-
First, apply liberal amounts of mousse
to the mid-lengths and ends of the hair.
-
Blast with a hairdryer to dry the mousse into the hair.
-
Pull the hair up into a very high ponytail on the top of the head.
-
Divide the ponytail into several sections then tease each section with a
comb, creating lots of volume and texture (it should look a little
crazy right now so don�t be alarmed� it will soon be tamed!)
-
Brush the ponytail out just a little bit to even out the texture, then
wrap the hair around the ponytail to create a messy topknot.
-
Secure with bobby pins all the way around.
-
Finally, spray the hair with hair spray.
-
Work in Mousse all through the hair, then dry in.
-
Section off the hair to create some loose, semi-curls (they need to have
bend, but not be fully curly). Start curling a few inches down from the
roots.
-
Spray the hair with Spray to create a relaxed, beach texture.
-
Finally, blast the hair with a hair dryer to break it up.
hairstyle courtesy:
http://www.fashionising.com
-
WF Team
Dated 17 December 2011
Related Links
|


