Aids in restoring and rejuvenating your energy levels
Yoga Asanas for Swimmers
Bhujangasana – Cobra Pose: Lie prone on the floor. Stretch your legs back, tops of the feet on the floor. Spread your hands on the floor under your shoulders. Hug the elbows back into your body. Press the tops of the feet and thighs and the pubis firmly into the floor. On an inhalation, begin to straighten the arms to lift the chest off the floor, going only to the height at which you can maintain a connection through your pubis to your legs. Press the tailbone toward the pubis and lift the pubis toward the navel. Narrow the hip points. Firm but don’t harden the buttocks. Firm the shoulder blades against the back, puffing the side ribs forward. Lift through the top of the sternum but avoid pushing the front ribs forward, which only hardens the lower back. Distribute the backbend evenly throughout the entire spine. Hold the pose anywhere from 15 to 30 seconds, breathing easily. Release back to the floor with an exhalation.
Adho Mukha Svanasana – Downward Facing Dog Pose: Begin on your hands and knees. Your wrists should be underneath your shoulders, and your knees underneath your hips. Inhale as you tuck your toes under your heels. Then exhale to lift your hips, coming into an upside down “V” shape called Downward Facing Dog. Spread your fingers wide and create a straight line between your middle fingers and elbows. Work on straightening your legs and lowering your heels toward the ground. Your heels should be slightly wider than your toes, so the outside edges of your feet are parallel with the outside edges of your mat. Relax your head between your arms, and direct your gaze through your legs or up toward your belly button. Work on holding for five breaths.
Gomukhasana – Cow Face Pose: This pose is ideally done while putting all your weight on your knees. If you would like to try doing this asana on your knees, bend them and place them on a yoga mat – such that your upper body is erect and your knees take all your weight. Make sure your toes are pointing downwards and are driving towards the ground. Now take your right hand and bend it at the elbows and place it behind your back. Make sure your finger tips are pointing upwards and are close to your spine. Take your left hand above your head, while bending it at the elbow above your head. Now, while placing it at the nape of your neck, try to grasp your right hand with it. The aim of this asana is for you to be able to hold your hands behind your back. Breathe normally and get out of this pose by first sitting down and then bringing your hands back to theirnormal position.
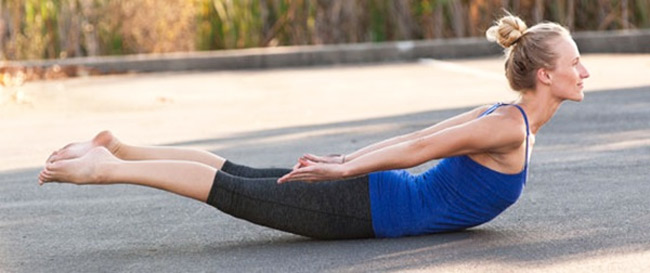
Salabhasana – Locust Pose: Lie on your front. Rest your chin on the ground, then move it forward as much as you can, so that your throat lies almost flat. Put your arms by your sides, then push your hands under your body, and make them into fists or clasp them together. Bring your elbows as close together as possible. Inhale as you lift one leg. Hold this position for at least 10 seconds, then exhale while lowering your leg and repeat the pose with your other leg. Practice it 3 times on each side. Chin position: The further forward you push your chin, the more your spine can stretch and the more you will gain from this asana. Lie with your chin out, as in the Half Locust, then take 3 deep breaths. On the third, lift both legs off the ground. They may not come up far at first, but with practice you may be able to lift them much higher. Hold for as long as you can, then lower your feet. Repeat twice and then relax. Up and Up: With practice, you will be able to raise your legs higher. Eventually, you may even be able to lift your body vertically.
Dhanurasana – Bow Pose: Lie on your stomach. Bend knees, hold the ankles. Pull your hands and push with your legs, knees together, till the trunk forms an arch with only the stomach on the ground. Look up. After releasing the posture lie for a while in Shavasan.
Urdhva Mukha Svanasana – Upward Facing Dog Pose: While this asana resembles Bhujangasana,there are differences in the alignment as well as the way they affect your body. In Urdhva Mukha Svanasana, your body comes into touch with the mat only through the hands and toes, while in Bhujangasana your legs remain on the floor. This revitalizing backbend pose helps in opening up a stiff chest, which is quite common in swimmers.
Setu Bhandasana – Bridge Pose: Come to lie on your back with the knees bent and the soles of your feet flat on the floor. Have a yoga block handy. You should be able to barely touch the backs of your heels with your fingertips when the arms are lying on the floor. The feet should be parallel and stay that way through the duration of the pose. Press down into the soles of the feet as you lift the hips off the floor. Slide your yoga block under your back directly under the sacrum. Let your sacrum rest on the block. Let the arms rest alongside the body. This should be a comfortable resting position. You may wish to stay here several minutes. To come out, press down into your feet and lift the hips again. Remove the block and gently lower your back to the floor.
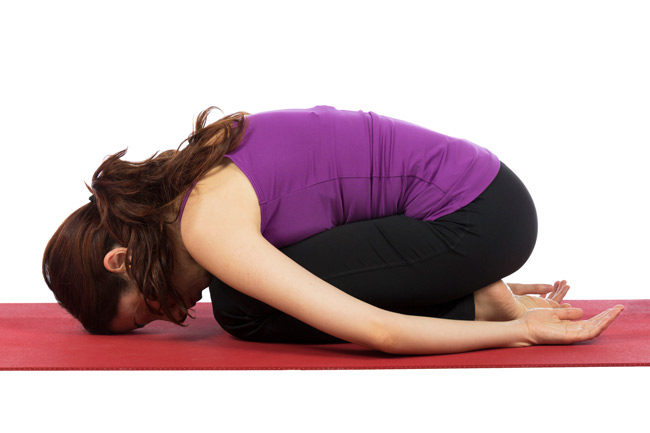
Balasana – Child Pose: From Downward Facing Dog, drop the knees to the floor. Spread the knees as wide as the mat, keeping the big toes touching. Bring the belly to rest between the thighs and the forehead to the floor. There are two possible arm variations: Either stretch the arms in front of you with the palms toward the floor or bring the arms back alongside the thighs with the palms facing upwards. Do whichever feel more comfortable to you.
Baddha Konasana – Bound Angle Pose: Sit on the floor with your legs stretched out.Inhale and exhale then while exhaling bring your feet close to your groin and push the sole of your feet against each other. Hold to your toes and when exhaling try to lower your knees to the ground as much as you can. Hold this pose for about 3-5 minutes while slowly inhaling and exhaling.
Anuloma Viloma Pranayama – Alternate Nostril Breathing: In Anuloma Viloma, you adopt the Vishnu Mudra with your right hand to close your nostrils. Tuck your index and middle finger into your nose. Place the thumb by your right nostril and your ring and little fingers by your left. Inhale through the left nostril, closing the right with the thumb, to the count of four. Hold the breath, closing both nostrils, to the count of sixteen. Exhale through the right nostril, closing the left with the ring and little fingers, to the count of eight. Inhale through the right nostril, keeping the left nostril closed with the ring and little fingers, to the count of four. Hold the breath, closing both nostrils, to the count of sixteen. Exhale through the left nostril, keeping the right closed with the thumb, to the count of eight.