|
|
Yog - Asanas
The word asana literally means a posture. Out of the innumerable asanas a body
can take, 84 have been identified as Yogasanas through which one can transform
the body and mind into a great possibility for ultimate wellbeing. This section
focuses on various yoga asanas with detailed instructions and precautions.
Note: Practice these asanas under the careful guidance of a trained
instructor.
Yog - Asanas
Eye Exercise
-
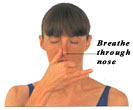 Exercising the eyes releases any build-up of tension and aids relaxation. When practicing, keep your head still and move only your eyes. Exercising the eyes releases any build-up of tension and aids relaxation. When practicing, keep your head still and move only your eyes.
-
Look Ahead
-
Stare at your thumb, then look into the distance.
-
Relax and repeat.
-
Move eyes
-
With wide,
look from side to side 10 times, then up and down 10 times, and then
diagonally 10 times.
Top
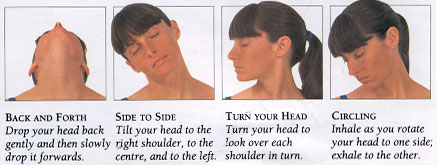
Neck Exercises
Relax your neck muscles by combining these four exercise. Sit cross-legged and practice each set of neck exercises at least three times.
Purpose of Sun Salutation
The Sun Salutation is a 12-part warm-up exercise. It limbers up the body and mind in preparation for the ensuing yoga session. Each of the 12 positions brings a different vertebral movement to the spinal column and is tuned to the inhalation or exhalation of the breath, thereby instilling a feeling of balance and harmony. The positions follow on from one another, making this Salutation graceful to perform. Attempt to do at least six sequences at the start of every session.
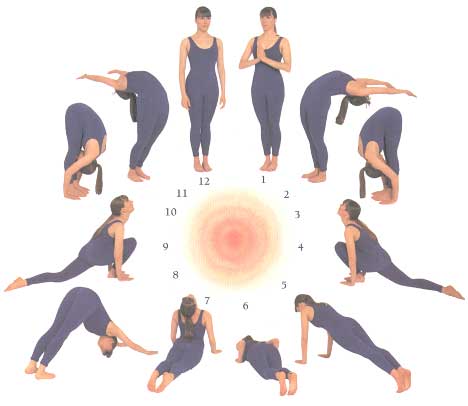
Prayer Pose
Stand up straight with you feet together and your arms by your sides. Take a deep breath, and then exhale while bringing your palms together at chest level.
Arch Back
Inhale and stretch your arms up over your head. Arch your back, so your hips come forwards, and stretch as far as is comfortable.
Bend Over
Exhale as you stretch forwards and bend down into the third Sun Salutation position. Bring your hands down to the floor, and place them next to your feet, with the palms downwards. Your hips should be kept as high as possible. If necessary, bend your knees so you can touch the ground. Tuck your forehead in towards your knees.
Leg Back
Inhale as you stretch your right leg back as far as possible and bend your right knee, lowering it to the floor. Stretch your head and look upwards. Your hands should stay in the same position throughout the movement.
Push up Pose
Retain the breath. Bring your left foot back, next to your right foot. Keep your spine straight and do not let your head or hips drop.
Lower Chest To The Floor
Exhale, Lower your knees to the floor and your chest straight down between your hands, without rocking your body. Bring your forehead to the floor (a beginner may need to lower the chin instead).
Arch Your Chest
Inhale as you slide your body forwards and bring your hips down to the floor. Arch your chest towards and tilt your head back. Slightly bend your elbows into your body.
Inverted 'V'
Exhale, tucking your toes under, and raising your hips to come into the inverted "V". Do not move your hands or feet as you come into position.
Lunge Forwards
Inhale as you bring your right foot forwards and place it between your hands, dropping your left knee to the floor. Raise your head and look up to the ceiling.
Forehead to Knees
Exhale as you bring your left foot forwards and place it next to your right foot, so that the tips of your fingers and toes form a straight line. Raise your hips and stretch them upwards, keeping your hands in the same position. If you cannot straighten your legs fully, allow your knees to remain slightly bent, but keep your hips up throughout. Bring your head down as far as possible and tuck it in as close to your knees as you can manage.
Stretch Back
Inhale and then stand up, stretching your arms over your head as you straighten your body. Stretch your arms back, arch your chest and hips, and keep your feet together.
Return To Start
Exhale and straighten up, lowering your arms to your sides. Now take a deep breath and prepare to begin another Sun Salutation sequence.
Purpose of shoulder Stand Cycle
The shoulder stand cycle strengthen the muscles, improves spinal flexibility, and balances the thyroid gland. This gland, in the neck gives energy, equalizes the metabolism, controls body weight, removes poisons from the blood, and produces a radiant complexion.
Shoulder Stand
Purpose of the Shoulders Stand Cycle
The shoulder stand cycle strengthen the muscles, improves spinal flexibility, and balances the thyroid gland. This gland, in the neck gives energy, equalizes the metabolism, controls body weight, removes poisons from the blood, and produces a radiant complexion.
This posture stretches your upper back muscles . Before starting, reach over your head to ensure that you have plenty of room behind you.
1. Lie on your back with your arms by your sides and your palms facing down. Make sure that your feet are together.
2. Keeping your back on the ground, inhale as you raise your legs to an angle of 90 from the floor.
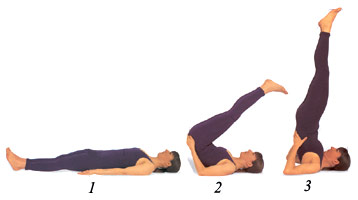
3. Place your hands on your buttocks with the fingers pointing towards the spine. Exhale, and raise your body by walking your hands up your back until you rest on your shoulders.
4. Breathing normally, hold the pose for at least 30 seconds. To come down, exhale and drop your feet halfway to the floor behind you. Place your hands flat on the floor below your back, and then slowly unroll your body.
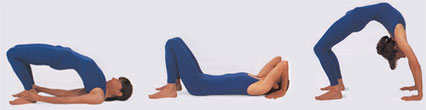
Plough
The shoulder stand leads into the plough, a position in which your feet touch the floor behind your head to create a powerful forward bending of the spine. The plough increases overall flexibility, but it is particularly effective for relieving tension in the upper back and shoulders. As in the shoulder stand, the chin rests on the neck and massages the thyroid
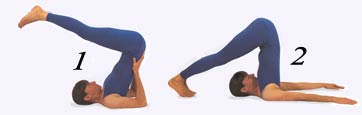
1. Supporting your back, inhale deeply, and then exhale as you lower your legs.
2. When your feet touch the ground, lay your arms on the floor with the palms down. Hold for 30 seconds. Slowly roll out of the position.
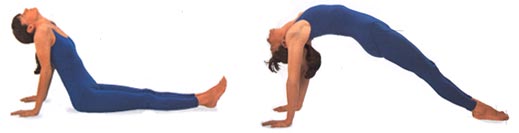
Bridge
The Bridge is a backward bend. Perform after the Plough to provide a complementary stretch of the
thorasic and lumbar regions.
1. Starting from the Corpse Pose, bend your knees and place your feet flat on the floor.

2. Place your hands on your back with your fingers pointing towards your spine. Lift your hips high. Hold this pose for 30 seconds.
Fish
Tuck your arms close in under your body. Tilt your head back until the crown rests on
the floor. Inhale and arch your chest
upwards.

Butterfly
This sitting pose remedies poor posture by stretching and strengthening the muscles of the legs and the back. Start the pose by sitting up straight and looking ahead.
1. Bend your knees and draw the soles of your feet together.
2. Holding your feet with both hands, ease them in further towards your body. Gently bounce your knees to the floor.

3. As an advanced variation, bend your arms and use your elbows to push your knees gently towards the floor. Keep your back straight.
Inclined Plane
Immediately after a forward bend, counter-pose the movement by stretching the spine back the other way in the Inclined Plane Position. This pose also serves to strengthen the shoulders, arms, and wrists.
1. Sit on the floor with your legs straight, feet flexed, and your hands flat on the floor behind you. Allow your head to drop back.
2. Inhale as you raise your hips. Hold the position for about 10 seconds, keeping your knees straight. Exhale as you lower your hips and bottom to the floor.
Cobra
The Cobra is a face-down position in which you lift the upper body, curling up and back like the snake. By holding the posture, the deep and superficial muscles of both the back and abdominal region are toned and strengthened. It increases backward bending flexibility in your spinal column and relieves tension particularly in the lower back region.
1. Begin in the Frontal Corpse. Bend your elbows and place your hands flat on the floor beneath your shoulders. Tilt your head forwards until your forehead touches the floor. Tuck your elbows into your sides.
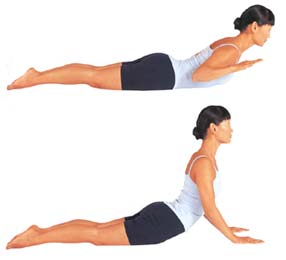
2. Inhaling steadily, roll your head back slowly, raising your forehead and bringing first your nose, and then your chin, into contact with the floor. Keep pressing down with your hands.
3. Continue the steady inhalation as you slowly push down with your arms to raise your head and chest up, arching backwards away from the floor. Try to press your hips and legs down into the floor, allowing only your upper body to be lifted up.
4. Arch back as far as is comfortable by raising your chest and abdomen. Keep your hips on the ground. Roll your neck back and look up. Breathe as you hold the pose for 10 seconds.
Take a deep breath, and exhale as you roll slowly out of the posture, uncurling your back first and keeping your head back until last. Repeat three times.
Bow
The bow works all parts of the back simultaneously, increasing strength and suppleness in the spine and the hips. While holding the pose, the arms are held taut, and this helps to stretch the beck, leg, arm, and shoulder muscles.
1. Lie on your front with your forehead on the floor. Bend your knees and reach your arms back until your hands can grip your ankles.
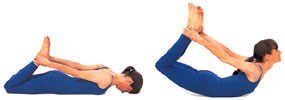
2. Inhale. Raise your head, chest, and legs and attempt to straighten your legs. Hold the pose for 10-30 seconds while breathing normally. Exhale as you release the pose. Repeat three times.
Camel
The Camel enables you to exercise all of your back muscles and extend your spinal column, by bending your back fully. It is very useful for increasing spinal and hip flexibility.
1. Begin the posture by sitting on your heels. Keep your knees close together and your calves parallel with each other.
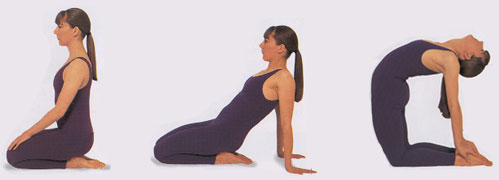
2. Place your arms behind your body with both palms flat on the floor. Lean back so that your weight rests on your hands.
3. Drop your head backwards. Raise your hips and arch them forwards; walk your hands inwards to clasp your heels. Keep your back arched throughout.
Wheel
The Wheel may look difficult, but it is worth working at slowly and systematically, as it can bring great strength and flexibility to the spine and back muscles.
1. Lies on your back, bend your knees, and put your feet flat on the floor, near your buttocks, hold your ankles.
2. Put your hands flat on the floor behind your shoulders with the fingers pointing towards your shoulder blades.
4. Lift your hips, arching your entire spine and dropping your head back. Only your hands and feet remain planted on the floor. Aim to hold this posture for 30 seconds.
Spinal Twist
Side-to-side mobility is usually the first type of flexibility to be lost as our bodies become older. This posture stretches the spine, helping it to regain this mobility . As the vertebrae are mobilized, the roots of the spinal nerves and the nervous system are toned and provided with an increased blood supply. Work both sides of the body equally to gain the full benefit of the exercise.
1. In preparation for the Spinal Twist, sit on your heels. Knees and feet should be together, and the chest faces forwards.
2. Gently shift your buttocks down to the floor on the left side of your legs. Keep your back straight and centered over the buttocks.
3. Bring your right knee in close to your chest, and gently lift it over your left leg; place the right foot flat on the floor by your left knee.
4. Keeping your body straight and upright, turn your body to the right and place your right hand flat on the floor. Raise your left arm and stretch it up above your head.
5. Twist your body to the right and look over your shoulder. Carry your left arm around your right knee, clasping your right ankle. Hold the pose for k30 seconds. Repeat on the other side.
Meditation as a part of Yoga
Meditation is beneficial for everyone, especially those with hectic, stressful lives. In medication, the overactive mind is calmed and turned inwards. This recharges the batteries, increases physical stamina and spiritual strength, and improves the powers of concentration. Regular meditation produces a clear mind and a sense of great inner peace.
What is Meditation
To understand what true meditation is, consider a lake. When the surface of a lake is still you can see to the bottom clearly. When the surface is agitated by waves, this is impossible. The same is true of the mind. When it is still you may see and experience inner calm.
Meditation involves a subtle act of "letting
go" - and it is not something that you can learn through sheer hard work .
Some women benefit greatly from this kind of preparation , where as others
can slip into meditative state comparatively easily without it .
When and Where to Meditate
If meditating inside, choose a warm space, free from noisy distractions and clutter. If outside, choose a place where you feel safe and relaxes, and there is little extraneous activity to disturb you. You can practice meditation at any time of day or night, but try to the get into a daily routine to make it easier to train your mind.
Comfortable Cross Legged Position
A comfortable sitting pose is very important if you are to meditate properly without distraction. Sit with your legs crossed and your spine erect. You should hold your shoulders straight, but relaxed. Children find this pose easy, but adults may need some assistance. Place a cushion under the buttocks to relieve any tension in the lower back.
Hand Position
The following positions are all suitable for meditation. Aim to hold your hands as comfortably as possible. This ensures that you remain relaxed while meditating . Resting your hands on your knees or in your lap also helps to hold the spine straight and shoulders erect.
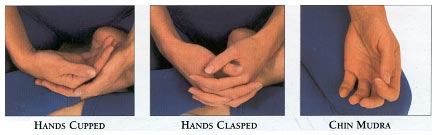
Hands cupped - Place one hand on top of the other, palms upwards, and lay them in your lap.
Hands clasped - Clasp your hands gently by interlocking your fingers,. Lay your hands in your lap.
Chin Mudra - Use your thumb and first finger to form a circle. Rest your hands on your knees.
Regulate your Breath
Breathing is a key element in meditation and concentration. Begin with 5 minutes of deep abdominal breathing, to provide your brain with plenty of oxygen. Then slow your breathing right down, keeping it rhythmical, inhaling for 3 seconds and then exhaling for 3 seconds.
If your Mind Wanders
At first you will find that your thoughts tend to jump about. Do not try to force your mind to be still, as this will set additional brain waves in motion, hindering your meditation. Allow it to wander, and then gently command it to become calm. Focus your energy and your attention inwards by concentrating on an uplifting mental image.
Ask the Experts
Popular Sections
|
| |
|
|
|


