The shoulder is the most flexible joint in the human body. The anatomical structure of this joint enables it to have an incredible amount of freedom or range of motion. The ability to move the shoulder joint in a wide variety of directions is vital for complete functionality in sporting activities. Increased mobility of the shoulder joint comes at the potential expense of joint stability. Therefore anyone can experience shoulder problems. Active young people, especially children and athletes often develop shoulder injuries. After the age of 25, many individuals develop shoulder pain from the wear and tear of routine activities. Individuals who reach middle age, and use their shoulders frequently in their specific occupation are particularly susceptible to problems. Other groups especially prone to shoulder problems are weekend athletes and do it yourself painters.
To Prepare for Workout:
Stand on an even surface with your feet parallel and hip width apart. Let the weight of your body rest on the arches of your feet and remain balanced from front to back and side to side. As in the seated posture, elongate through your waist, and slightly elevate your chest. Relax your shoulders, and allow your arms to rest softly at your sides. Elongate the back of your neck and lengthen through the crown of your head. Then soften any rigidity in your body and maintain your alignment with an easy grace.
Take a moment to observe your breathing. Soften the sides of the rib cage and abdomen, and allow the breathe to flow smoothly and evenly. Maintain your breathe awareness throughout the exercises and as you rest between the poses.
During the following sequence, come back to this simple standing posture after each of the exercises and rest for a moment, being aware of how you feel in your body. Notice each time if and how the exercises have changed how you feel. Unless otherwise indicated, repeat each exercise 3 times, or to your capacity, avoiding strain.
![]() Shoulder Shrugs
Shoulder Shrugs
Keep your head erect and still. As you inhale, slowly raise your left shoulder toward your left ear, contracting the muscles alongside your shoulder and neck. Hold briefly and then suddenly release the shoulder, dropping it back to its starting position. Repeat with the right shoulder, completing a total of 3 times on each side. Finally, raise both shoulders as high as you can, and hold for several seconds. Then exhale and slowly lower the shoulders, softening the shoulder muscles completely. Repeat twice more with both shoulders.
![]() Rotations with Relaxed Arms
Rotations with Relaxed Arms
Stand with your arms hanging loosely at your sides. Keeping your right shoulder still, exhale and slowly rotate your left shoulder forward. Inhaling, draw the shoulder up toward your left ear, and continuing to inhale, bring the shoulder back as if you are trying to touch the shoulder blade to the spine. Exhaling, lower the shoulder to the starting position, and draw it forward again. Continue circling 3 times, inhaling as you lift the shoulder and draw it back, and exhaling as you lower the shoulder and draw it forward. Then change direction and repeat 3 more times.
Continue with rotations of the right shoulder, keeping the left shoulder relaxed and still. Finally, rotate both shoulders 3 times in each direction, coordinating the movements with your breath.
![]() Vertical Arm Swings
Vertical Arm Swings
Make a light fist with both hands, turning your palms to face your body. Keeping your shoulders and arms relaxed, swing your arms forward and back. At first, swing the arms lightly, simply feeling the movement at the shoulder joint.

Then begin to involve the shoulders as well. Feel your chest expand as your arms swing back, and feel your shoulder blades spread apart as the arms swing forward. To increase momentum, bend your elbows on alternate swings. Continue for 30 seconds or more. This movement is not coordinated with the breath.
![]() Horizontal Arm Swings
Horizontal Arm Swings
Raise your arms to your sides at shoulder height, parallel to the floor, with palms facing down. Keeping your arms straight, begin to swing them forward and back, alternately crossing one arm over the other. Keep your shoulders soft, relaxing any resistance in the pectoral muscles at the front of the shoulders, as well as in the muscles of the upper back.
As your arms swing forward, your shoulders are drawn toward one another in front of your chest and your back expands, separating your shoulder blades.
As your arms swing back, your chest is expanded, drawing your shoulder blades closer together. Repeat in a continuous, fluid motion, alternating the arm on top each time. Continue for 30 seconds or more. This movement is not coordinated with the breath.
![]() Rotations with Extended Arms
Rotations with Extended Arms
Lift your arms in front of you at shoulder level, palms facing up. Keeping your shoulders relaxed, draw them forward and up, first extending the arms forward and then slowly raising them above the shoulders with palms facing back. Continue to rotate your shoulders back and down, and as you do, bend your elbows, reach your arms back, and bring your fingertips to your shoulders.
Let the elbows come down in the front until they are about parallel to the floor. Now reverse direction, raising the elbows, straightening the arms, and reaching the shoulders back and up. Once the arms are straightened above, Once you are comfortable with the movement, try changing the hand position. Begin with palms facing one another or with palms facing down. Each hand placement will have a different effect on the ball-and-socket joint at the shoulder. You can repeat each variation up to 3 times.
![]() Chest Expander
Chest Expander
Stand erect. Raise and stretch the arms straight out to the sides at shoulder level, palms facing forward. Exhaling, smoothly swing the arms forward, stretching the shoulders forward, expanding the back, and bringing the palms together, fingers lightly touching. Inhaling, bend your elbows and bring the palms to the chest.
Stretch the chest open, expanding the palms and elbows to the sides without lowering the arms. Exhaling, straighten the arms in front once more, stretching the shoulders forward and expanding the back. Finally, inhaling, swing the arms open and expand the chest, drawing the shoulders back.
Repeat the entire sequence of movements 3 or more times, coordinating each movement with your breath.
![]() Shoulder Wings
Shoulder Wings
Bend your arms and bring your fingertips to the tops of your shoulders, with your elbows facing forward. Press your elbows together, expanding your back and separating the shoulder blades. Now slowly begin to circle with the elbows as if they were wings.
Draw them up in the front, then circle back, lowering the elbows as the shoulder blades are drawn together. Finally, draw the elbows forward to the starting position. Circle 3 times in each direction.
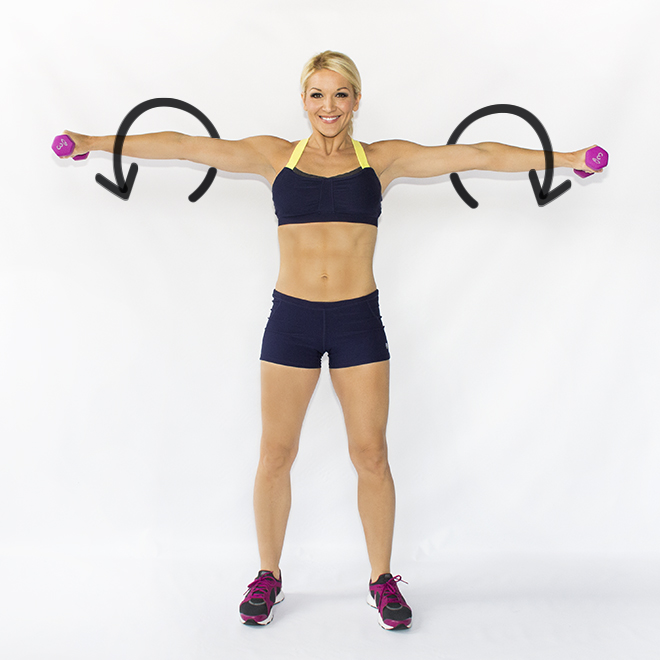
![]() Arm Circles
Arm Circles
Raise your arms to your sides at shoulder height, parallel to the floor, palms facing down. Keeping your shoulders relaxed and arms straight, circle your arms, starting with small movements and gradually increasing until the circles are as large as possible.
Now change direction, continuing with the large circles and gradually decreasing their size until the arms become motionless again. Then your arms to the sides and relax.
![]() Wrist Bends
Wrist Bends
Raise your arms in front of you until they are parallel to the floor. The palms face down with fingers and thumbs together. Keeping your arms and fingers straight, bend at the wrists and raise your fingertips toward the ceiling. Slowly bring your hands back to the starting position. Then flex the wrists, stretching your hands down with your fingers pointing toward the floor. Again, slowly bring your hands back to the starting position.
Complete 3 repetitions in each direction. From the original starting position, slowly bend the wrists sideways to the right, pointing your fingers while keeping your palms parallel to the floor. Slowly return your hands to the starting position. Now point the fingers to the left, again keeping the palms parallel to the floor. Once again, slowly bring the hands back to the starting position. Complete 3 repetitions on each side.
![]() Hand Circles
Hand Circles
Here are four variations of wrist circling to bring flexibility and strength to your wrist joints.
- Begin with your arms raised in front. Bend at the wrists, stretching your hands up with your fingers pointing toward the ceiling. Now with a smooth and fluid motion, circle with both hands, completing 3 full circles, first in a clockwise direction and then in a counterclockwise direction. Maintain full extension of the wrists as you circle and try not to let your arms lower toward the floor.
- Next, rotate the left hand in a counterclockwise direction while circling the right hand in a clockwise direction. After 3 rotations, change direction and complete 3 more times.
- Now spread the fingers apart as far as possible and circle 3 times in each direction.
- Finally, repeat in both directions with the fingers bent to form tight “claws,” fingertips tucked and placed just at the base of the fingers themselves.
These simple movements require only modest exertion, and are extremely beneficial to the muscles of the shoulder, improving circulation, developing coordination, and expanding the range of movements.
Disclaimer
The Content is not intended to be a substitute for professional medical advice, diagnosis, or treatment. Always seek the advice of your physician or other qualified health provider with any questions you may have regarding a medical condition.