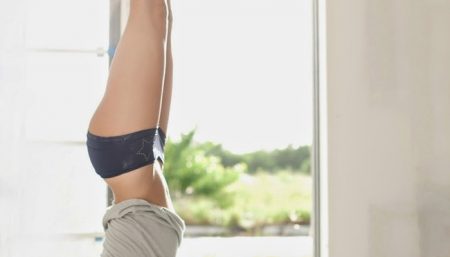
The reverse poses of our usual upright orientation are referred to as inverted or upside down poses.
Some examples of inverted poses are: Downward-facing Dog, Standing Forward Fold, Prasarita Padottanasana, Dolphin, Shoulder Stand, Headstand, and Legs-up-the-wall Pose. Headstand and shoulder stand are referred to as the king and queen of all yoga asanas. Headstand is referred to as the king of all poses, while shoulder stand is referred to as queen of all poses.
The Inverted poses have a number of benefits:
- Focus and concentration become heightened – both physically and mentally.
- The inverted postures are very strengthening. The shoulders, back, abdomen, and legs work especially hard (when done correctly), as they are learning to work against gravity from the opposite direction.
- Healthier and more effective lung tissue. When we invert, blood perfuses the well-ventilated upper lobes of the lungs, thus ensuring more efficient oxygen-to-blood exchange and healthier lung tissue.
- Enhanced Circulation of blood. Because the blood carries in nutrients and carries away waste, strong circulation is a very important part of good health.
- Being upside-down flips around the internal and digestive organs. These asanas are good for digestive troubles of any sort.
- Inversions are very calming and energizing… you’ll come out of your practice feeling confident, centered, stable, and ready to engage with the world around you.
- Enhanced Immunity: the lymphatic system is a closed pressure system and has one-way valves that keep lymph moving towards the heart, when one turns upside down, the entire lymphatic system is stimulated, thus strengthening your immune system.
Adho Mukha Svanasana (Downward Facing Dog)
 Begin on your hands and knees. Your wrists should be underneath your shoulders, and your knees underneath your hips.
- Inhale as you tuck your toes under your heels. Then exhale to lift your hips, coming into an upside down “V” shape called Downward Facing Dog.
- Spread your fingers wide and create a straight line between your middle fingers and elbows. Work on straightening your legs and lowering your heels toward the ground. Your heels should be slightly wider than your toes, so the outside edges of your feet are parallel with the outside edges of your mat. Relax your head between your arms, and direct your gaze through your legs or up toward your belly button. Work on holding for five breaths.
Sirsasana (Headstand)
- Interlace fingers to form a cup with palms. Place forearms and wrists on a folded blanket.
- Place crown of head on floor with slight emphasis of weight towards forehead.
- Walk feet towards head and lift knees gently upward.
- Straight legs extended.
- Lengthen both sides of ribcage.
- Navel-point in.
- Tailbone extends towards heels.
- Shoulder blades wide and floating towards kidneys to decompress neck.
- Follow with Shoulder-stand or Child’s pose.
- Always maintain a calm and even breath.
Uttanasana (Standing Forward Bend)
 Start standing in Tadasana (straight in upright position), with feet together or hip distance apart. You may bend your legs slightly if your muscles or your spine are really tight.
- Inhale and raise your arms forward parallel and up to line alongside your ears, with fingers pointing up and palms facing in. Exhale and bend from your hips, stretching arms and torso forward to a tabletop position, arms in line with your ears.
- Hold for two or three breaths before stretchingdownward on an exhalation. Keep arms alongside your ears and keep spine extended as much as possible.
- Place your hands wherever you can reach on your legs; if your can, take hold of your ankles or place hands on the ground. Hold in this position for two or three breaths.
- On an exhalation, draw your head in toward your legs, using your arms to assist you as your elbows open out to the sides and your spine rounds over legs.
- You can remain in this position for 30 seconds to one minute. The beginners should not give more stress to any limb by stretching it for longer period.
Sarvangasana (shoulder stand)
- To start with, lie flat on the floor. The arms should rest along the sides, palms downwards. Exhale once, bend the knees, and bring them up towards the chin till the thighs press the stomach. Breathe normally.
- Now, exhale and supporting the buttocks with the hands, raise the trunk till it becomes perpendicular to the floor. Now, your body will be supported by the back of the head, the neck, the shoulders and the backs of the arms up to the elbows. To push the trunk into the vertical position, you will need to gradually move the hands towards the waist. The head continues to rest on the floor, so that the trunk also becomes perpendicular to the head. Once it is correctly perpendicular, the chin will touch the chest.
- Now, raise the legs and make them vertical, in line with the trunk, with the toes pointing upwards. Breathe evenly, calmly and easily. Stay in the pose for a few minutes and feel the good it is doing you.
- To release the pose, gently move the legs downwards, release the hands and let the body become flat again. You may also bring the legs down so that the knees approach the ears, and then gradually bring the legs down. Be gentle on your body. Never apply excessive stress. To start with, practice the initial position, drawing the knees towards the chin.
Release the pose gently.
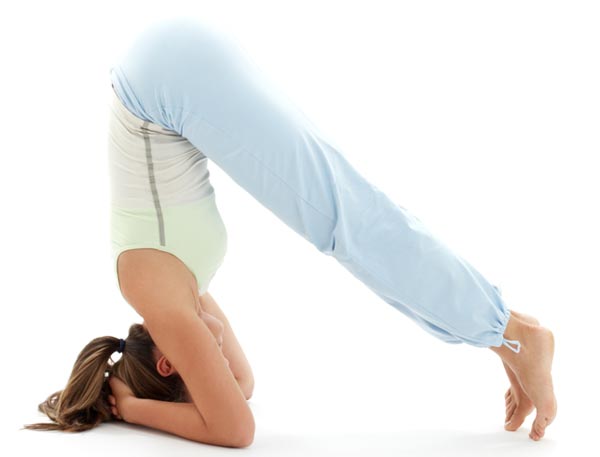
Makarasana (Dolphin Pose)
- Come onto the floor on your hands and knees. Set your knees directly below your hips and your forearms on the floor with your shoulders directly above your wrists. Firmly press your palms together and your forearms into the floor.
- Curl your toes under, then exhale and lift your knees away from the floor. At first keep the knees slightly bent and the heels lifted away from the floor. Lengthen your tailbone away from the back of your pelvis and press it lightly toward the pubis. Against this resistance, lift the sitting bones toward the ceiling, and from your inner ankles draw the inner legs up into the groins.
- Continue to press the forearms actively into the floor. Firm your shoulder blades against your back, then widen them away from the spine and draw them toward the tailbone. Hold your head between the upper arms; don’t let it hang or press heavily against the floor.
- You can straighten your knees if you like, but if your upper back rounds it’s best to keep them bent. Continue to lengthen your tailbone away from the pelvis and lift the top of your sternum away from the floor.
- Stay between 30 seconds to one minute. Then release your knees to the floor with an exhale.
Viparita Karani-Legs up the wall
Said to reverse the normal downward flow of a precious subtle fluid called amrita (immortal)
 For your support you’ll need one or two thickly folded blankets or a firm round bolster. You’ll also need to rest your legs vertically (or nearly so) on a wall or other upright support.
Before performing the pose, determine two things about your support: its height and its distance from the wall. If you’re stiffer, the support should be lower and placed farther from the wall; if you’re more flexible, use a higher support that is closer to the wall. Your distance from the wall also depends on your height: if you’re shorter move closer to the wall, if taller move farther from the wall. Experiment with the position of your support until you find the placement that works for you.- Start with your support about 5 to 6 inches away from the wall. Sit sideways on right end of the support, with your right side against the wall (left-handers can substitute “left” for “right” in these instructions). Exhale and, with one smooth movement, swing your legs up onto the wall and your shoulders and head lightly down onto the floor. The first few times you do this, you may ignominiously slide off the support and plop down with your buttocks on the floor. Don’t get discouraged. Try lowering the support and/or moving it slightly further off the wall until you gain some facility with this movement, then move back closer to the wall.
- Your sitting bones don’t need to be right against the wall, but they should be “dripping” down into the space between the support and the wall. Check that the front of your torso gently arches from the pubis to the top of the shoulders. If the front of your torso is flat, then you’ve probably slipped a bit off the support. Bend your knees, press your feet into the wall and lift your pelvis off the support a few inches, tuck the support a little higher up under your pelvis, then lower your pelvis onto the support again.
- Lift and release the base of your skull away from the back of your neck and soften your throat. Don’t push your chin against your sternum; instead let your sternum lift toward the chin. Take a small roll (made from a towel for example) under your neck if the cervical spine feels flat. Open your shoulder blades away from the spine and release your hands and arms out to your sides, palms up.
- Keep your legs relatively firm, just enough to hold thighs vertically in place. Release the heads of the thigh bones and the weight of your belly deeply into your torso, toward the back of the pelvis. Soften your eyes and turn them down to look into your heart.
- Stay in this pose anywhere from 5 to 15 minutes. Be sure not to twist off the support when coming out. Instead, slide off the support onto the floor before turning to the side. You can also bend your knees and push your feet against the wall to lift your pelvis off the support. Then slide the support to one side, lower your pelvis to the floor, and turn to the side. Stay on your side for a few breaths, and come up to sitting with an exhalation.
Note: People suffering from high blood pressure, detached retina, glaucoma, hernias, cardiovascular disease, cervical spondylitis, thrombosis, arteriosclerosis, and kidney problems should not practice headstand. Those suffering from neck injuries should seek advice from an experienced yoga teacher before beginning to practice headstand. It is advisable for women during menstruation to avoid inversions.
Disclaimer
The Content is not intended to be a substitute for professional medical advice, diagnosis, or treatment. Always seek the advice of your physician or other qualified health provider with any questions you may have regarding a medical condition.